- Configuration, tweaking the software to fit your hardware
- How to store the samples
- How to specify sample names and options per sample(set)
- Sample definition parameters reference
- Adding midi files to samplesets
- Effects and filters
- Button controlled menu
- Meaning of the LED signals
- Control via the MIDI controller
- Using MIDI thru/through
- GUI for usage via tablet, PC or mobile
-
- config.txt
Adapting is (only) necessary when using devices requiring own drivers.
Common case is an audiohat like HifiBerry, Pimoroni Pirateaudio etcetera (e.g. PiFi is a cheap clone of HifiBerry).
Tested options are given as comments; if you got an unlisted one working, please share!
- config.txt
-
- configuration.txt
Contains comments on various parameters
Check and adapt it to your setup, wiring, preferences etc - wifinetworks.txt
To define the known networks to connect to via WiFi
Comments in the file will guide you - wifistatips.txt
To define a fixed ip-address in named WiFi networks (advanced use)
Comments in the file will guide you - wifihotspot.txt
To set network (SSID) and password of the webgui via the wifi adapter
This is the option activated when there is no known network available
Comments in the file will guide you - wifixhosts.txt
Define extra clients in the hotspot network (advanced use)
This in fact the local hosts file - keynotes.csv
In this optional file you can give give anything that produces midinotes (keys on the keyboard, drumpads, etc) a name for use in note (re)mapping. You can always use the midinotes; this just makes it more human. See these examples of actually used definitions.
The mapping itself is done in the samples directories. - controllerCCs.csv
Here you tell samplerbox the specifics of your midi controller(s) regarding the control change messages it sends via the knobs, buttons, drawbars, pedals.
Other messages like (notes and program changes) are standard. - Controls.csv
This lists all functions available for use in the CCmap, purely for reference. - CCmap.csv
Here you tell how you want your knobs, buttons, drawbars, pedals to affect the available functions in samplerbox.
Basically this is the merge of controllerCC's and Controls. - chords.csv and scales.csv
The chords and scales to be generated by samplerbox - FXpresets.csv
The presets for the available controls=effects. Presetname is fixed to "Box" - menu.csv
The menu choices for the button menu
A button can be defined via GPIO, MIDI and webGUI
The menu can be displayed on a hardware or webGUI display - README_CSV.txt
The syntax and layout explanation of all these csv files - changelist.txt
History of changes, may help you reconfiguring after an upgrade - README.txt
Same list as above, this one and changlist are only on related image or GitHub branch.
- configuration.txt
- definition.txt: See the short description and the parameter reference.
- CCmap.csv:
This is similar as described above in configuration, but now with a left inserted column specifying the voice. Voice=0 is valid for all voices, unless when it's specifically defined/overridden in a voice. - FXpresets.csv:
This is similar as described above in configuration, but now the presetname can be now be anything but "Box" and special "Set" defines the sampleset default. - layers.csv:
This defines extra layers=sounds="voices" to be played together with the main voice=sound.
First column contains the layers name/label.
Subsequent columns (at least one) define the extra sounds in two forms:
- <voicenumber>
- <voicenumber>:<volume> with volume relative to the main sound's volume, 1.0 is neutral. - notemap.csv:
Here you can define mapping sets you can activate via %notemap or in the GUI; it outlines which (other) note should be played when a note is sent by the instrument ("when I play the C-key, I want to hear a D-note"), whether it should retuned and last but least whether the voice should be switched.
The last option allows you to make versatile keyboard splits, because you can specify per key what voice=instrument should be played.
The fractions columnn specifies the number of tones per semitone. Usually this is 1, use 2 for the 24 scale (Q-tunes).
Complicated ?? Don't worry, usually you don't need it and moreover: it's in the webgui, making life much easier. - Keyboards helpers: arpeggiator and autochord
- Effects/filters: chorus, reverb, moog-lowpass, wah (auto+lfo+pedal), limit/compress, overdrive/distortion, vibrato, tremolo, panning and rotate
- + / increase / up
- - / decrease / down
- select
- return
- Obviously the LEDs and the 7-segment display cannot support it
- The 2x16 display will normally show the status of the box
When the buttons are operated, the menu will replace that, combining the first and second line when the third line is not blank.
On turn, when another function changes the samplerbox status, the menu is replaced by the status lines - Displays with 4 lines or more can sufficiently show the menu, status line and more.
- The webGUI "LCD" screen can also pick up this display at an adaptable refresh rate.
- Hardware (GPIO) buttons defined in configuration.txt (see configuration).
However you may not have all four installed:
1: You can have only '+' and this will affect the first menu item. Default is "preset"
2: As above, but now you also have '-'. Using "preset" mimicks/supports the original samplerbox.
3: In the 2nd layer (functions in group) the '-' will return to the 1st layer.
3+4: In the 3rd layer (values of functions) the 'select' will return to 2nd layer.
.. just use it.. - MIDI controllers defined as menu buttons
- Buttons in the webGUI screen
- No sign: script not (yet) started or properly stopped
- Red blinking regularly: busy with initializing and/or loading sampleset
- Red having short blinks with long intervals: error in startup (configuration, controller/midi mapping or chords/scales) but the box is able to play without the definitions in error. If you can't find it by checking the configuration files you will have to debug.
- Green steady: sample set loaded OK, ready to play
- Green not steady (having short drops): ready to play, but the sample set contains errors so you may not have all you expect. The GUI will give some indication on the definition lines skipped. If you can't find it in the GUI or by checking the definition.txt of the sampleset, you will have to debug.
- Steady red with blinking green: loading has finished OK but nothing playable was loaded. So the definition.txt may not fit the samples or the wav's are all not fit for playing. You'll need to debug as indicated in previous dot.
- Message 12 = Program change
Changes the preset = sample folder. You can change the default MIDI values (0-15) to human program numbers (1-16) in the configuration.txt. Some controllers work that way. - Message 14 = Pitch bend (wheel / joystick / knob)
Pitch bend depth can be configured from 1 to 12 semitones, where depth 12 means from -12 to 12.- globally via the configuration.txt
- per sample set via the definition.txt
- during play via controller mapped in Message 11.
- via GUI.
- Message 11 = Continuous controller messages:
This is controlled globally via controllerCCs.csv and CCmap.csv; the distributed mapping file details the available samplerbox capabilities.
In a sampleset folder you can add an extra CCmap.csv for set/voice specifics. Note that layout of the global CCmap and set-CCmap are NOT the same, because of the ability to specify voice related CC's. - All input devices (also the internal SMFplayer) will be forwarded
- Ports to be opened as output (=receiving midi through) are defined in the
configuration.txt with the case insensitive MIDI_THRU parameter.
- "All" (without quotes) will open all available ports
- You can can use a comma separated list of devices
At manual startup, the script will show available portnames
- regular expressions (~wildcards) can be used, quickstart:
'.' = any character
'^' = "starting with"
'*' = 0 or more occurrences of preceding
'$' = "ending with"
Examples showing it's use:
- "MIDI_THRU = ^MIDI4x4.*3$" matches "MIDI4x4 28:3"
which is helpful as device number (28 here) may vary
- For all MIDI4x4 output ports: "MIDI_THRU = ^MIDI4x4.*" - Output ports are checked and opened at startup (no plug&play), so if a port to be opened isn't responding at startup it's a pity.
- A device will not get it's own input returned to avoid echoing.
The serial port, being DIY and by MIDI standard addressing two DIN connections, can serve two devices. For this, the echo protection can be switched off by defining "embed" as thru-port.
This way you can implement an extra synth like this to get interesting mixed sound possibilities. - MIDI running status optimization is decoded = no optimization in output
- Real-time and sysex messages are filtered on input and thus not forwarded.
- It can't be as fast as a hardware solution (currently hardly a consideration)
- The serial output is still experimental, please .
- To connect to your home (or other) network(s). Define the applicable network(s) in wifinetworks.txt
and connect to it similar as via cable.
If you need a fixed IP-address within a network/SSID, you can define this in wifistatips.txt. - You can also give (some) wireless networks priority for internet access.
This can be useful when also using a wire, but don't want this to be the default gateway.
If none of the defined networks are available/in range, it will fall back to: - As an access point, in order to be independent of whatever is available on stage.
The GUI itself is not protected, but the WiFi password will protect it from practical jokes by audience.
The distribution uses SSID "SamplerBox" with password "go2samplerbox"; this can be changed in wifihotspot.txt.
Once connected: start your browser, type "sampler.box" in the address bar and click go or press enter.
Your device might complain about having no internet access; just confirm it's OK. - The refresh button does a refresh without resending the form input as browsers do.
This is very handy as old / out-of-sync values will not overwrite the current box status.
And it's considerably faster... - After power on of the box, always do this refresh to sync with your browser.
- Likewise when the box status has changed via your midi controller or the physical buttons.
Similar if you use the GUI, the positions of the physical buttons/midi controls will not be changed ofcourse, so if you touch these you're back on the physical status. - The webGUI "LCD" screen can pick up the LCD display status at an adaptable refresh rate and also gives buttons functionality. This can virtualize physical controls on your smartphone.
- If you change USB storage device (mostly stick/thumbdrive), use the NewUSB/RenewMedia button and wait till the GUI is at rest with all parameters visible
- After updating the definition.txt via the SET button this "RenewMedia" is executed automatically. There is no screening on the input for the definition.txt. If you make errors, the interface will just mention the lines skipped when reloading the new definition.
- When (for whatever reason) the screen did not built up correctly, use the refresh button to give it a second chance. The PI is not a supercomputer....
Configuration
Configuration can be done via files in the boot partition. When the SD is inserted in a PC this is the first partition of the mounted device. If you work from the samplerbox commandline, this first partition is mounted as /boot and the samplerbox directory is also available as config/ in the directory where you are at logon (/home/samplerbox).
Links given below are examples, please rely on the versions in the distribution.How to store the samples
The box is shipped with a small builtin samples partition with some basic demo samples and definitions. You can extend this partition to make it more usable.
You can also use a USB stick to store the samples. Sometimes this stick is not recognized, please read the FAQ.
The samples partition must contain folders to contain the patch collections. Foldernames have to start with a number from 0 to 127 followed by a space and a free format description. This starting number can be changed via the configuration.txt to sync with your device (some use 1-128 for readability, while actually sending 0-127 and samplerbox can use this 1-128 as well for convenience).
The numbers correspond with the MIDI program numbers. The folder name will be displayed on the optional display up to the limits of that display.
So you can have your patch folders called "0 Piano", "25 Church Organ" and so on. The numbers have to be unique, otherwise the program changes will be ambiguous...
The samples themselves have to be standard WAV files, stereo or mono, 16 bits or 24 bits, commonly at a sampling rate of 44.1 Khz (see FAQ). Loop markers are recognized, unless when operating in once or onc2 mode.
Per note there may be multiple WAV's: for refining velocity value/timbre and/or for loading different instruments (called "voices") in one sample set.
Notes for which sample WAvs are missing will be generated.
Per patch / sample set the box's behaviour can be changed via optional files within the patch folder (keep in mind this is Linux, so the name is case sensitive):
Definition of sample names and specifying options per sample:
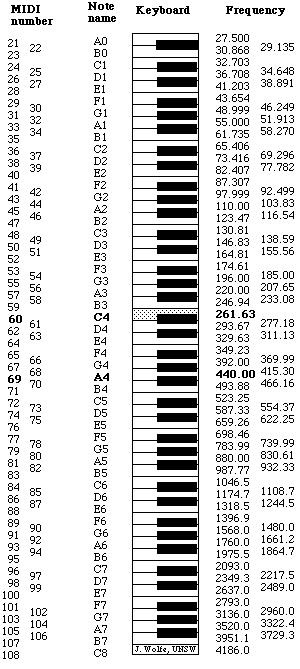
In the most basic situation (no definition.txt), the sample files within the folders have to be called 0.wav, 2.wav and so on till 127.wav. For the translation of notes to numbers, see the picture on the right.
For more control, the structure of names within this folder can be described using patterns in definition.txt on or more line(s) using keywords in form "%parm" or ",%parm=" and fixed text (wildcards can be used).
Next to these sample details, global keywords in form "%%parm=" on separate lines above the sample definitions can be used to set some general parameters or defaults for the %parms on the detailed sample lines.
See examples in the samples folder of , the samples folder of the and below.
Some older examples here & here (we have more keywords now).
Please see the "SalamanderGrandPiano_adapted_v2.zip" in the samples folder of the for a detailed example of improving this sample set (less latency, accurate velocity, less load time).
The original GrandPiano set uses multiple lines specifying the wav's to be selected with their corresponding fixed velocity value in a 127 steps scale. Velocity defaults to highest possible value. %%mode=keyb %%velmode=sample %%velolevs=127 %notenamev4.wav,%velocity=40 %notenamev7.wav,%velocity=60 %notenamev11.wav,%velocity=80 %notenamev14.wav,%velocity=100 %notenamev16.wav

This set shows voices and release. It uses actually one velocity range of the GrandPiano combined with Saw. Piano has fixed release, saw defaults to the longer "preset" value. %%mode=keyb %%release=100 %%velmode=accurate %notenamev*.wav,%release=30 %midinote.wav,%voice=2
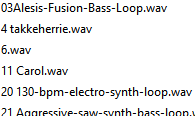
A demo definition set, which makes it possible to give the loops and fills a self explaining name. Directory on the left is interpreted correctly. %%mode=loop %%velmode=accurate %midinote*.wav
Adding midi files to samplesets:
If the internal midi file player is enabled in the system configuration, you can add songs to the sampleset folder and its definition.txt.
Only variable is the %smfseq to identify the file to the respective midi control/button for starting/stopping it.
So if you have "mysong.mid", you can define it with line "mysong.mid,%smfseq=1".
If samplerbox needs to display the songname, it uses the stream information and falls back to the filename if no title is present there.
Assigning the proper sounds to the miditracks in every file can be done via the Multi-timbral channel map.
Effects/filters and keyboard helpers:
Scope and impact on performance is indicated at Effects & audio filters.
Here you will also find links to pages giving more information (going into detail is interesting, but not for the weakhearted).
Despite warning above: just playing with the options is usually harmless and very inspiring. If you're really new, I suggest to set the limiter on when experimenting (especially with the moog filter). After you get acquainted you can turn it of for the fine tuning.
Button controlled menu:
Samplerbox supports a three layered menu system which can be controlled by (max) four buttons:
The menu structure is defined in the menu.csv (see configuration). The resulting 3-line menu is shown on the available display, depending the displays capability.
A red and green LED (or whatever you solder..) can give a rudimentary but very visible status of the box. Using my colors and naming:Note: if the script crashes, results are unpredictable = LED's are in the state of the crash. As the "systemctl stop samplerbox" forces a crash, the LED's will stay on until you have started the script manually and stopped it with ctrl-C.
Control via the MIDI controller:
Your midi controller device may be capable of sending midi controls via buttons, levers or wheels.
You can use the Configuration files together with the customizable items on the device(s) to enable the available controls to use samplerbox's capabilities.
This samplerbox is configured to recognize next control change messages:
Samplerbox can forward it's input to designated output ports. This is a software solution so it has pros and cons to be considered for your situation.
An embedded webserver gives access to all customizable parameters. It can be reached via all network connections on your PI using your webbrowser. Sofar it works as it should in Firefox, Chrome, Safari, Edge and Silk. Just try it...
NB: If you want to use a no longer used iPad/iPhone: in non-recent Safari the slider doesn't function well. You may get around using Chrome or Firefox.When you connect with a network cable: start your browser, type "samplerbox.<yourhomedomain>" in the address bar (or use the assigned IP-address) and go !
If you need a fixed IP-address on the wire, this can be assigned in the eth0 entry in wifistatips.txt (what's in a name..).The builtin WiFi adapter can be used:
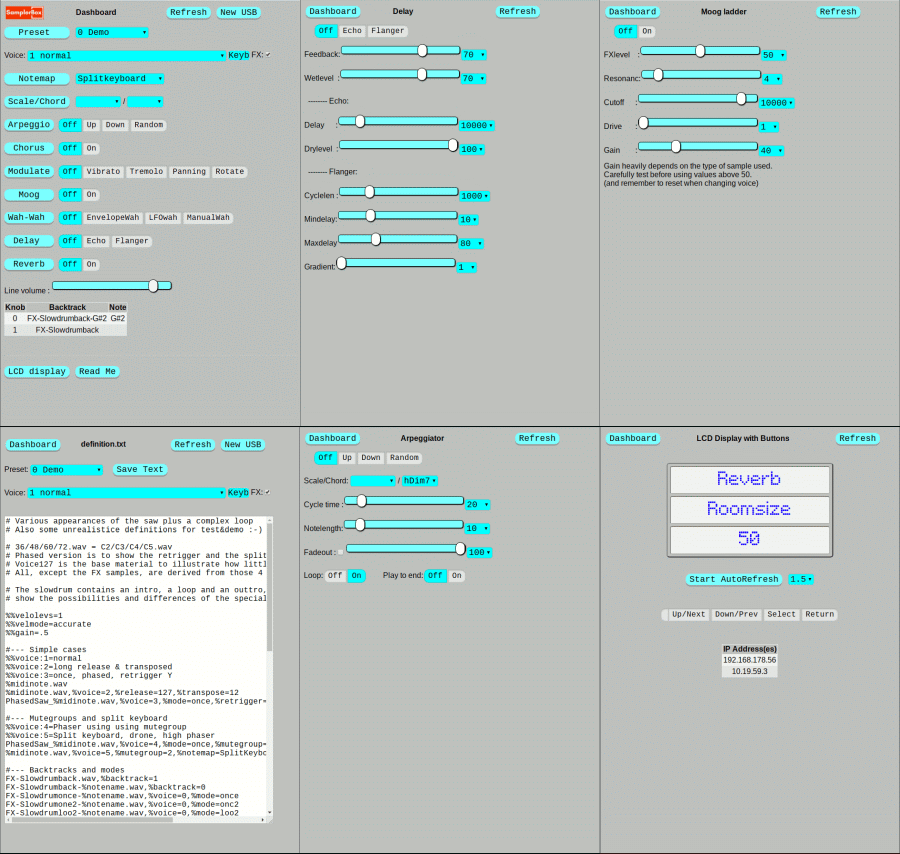
The GUI screens are built from building blocks, making it easy to tweak it to your preference. The screenshots on the right give examples of what is possible.
Good to knows:
 Selected a major-7 chord and
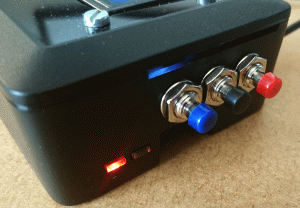 Red=+ Black=function Blue=-
