- Starting point: Instrument characteristics
- Synthesizing using midi controller
- Sampler (incl. implementation of sustain and release)
- Velocity level differentation in samples
- Sampled release (eg harpsichord and church organ)
- Random samples per note for human touch or plain fun
- Mutegroups = one note at a time per group
- Sustain and damper pedals (or knobs)
- Damp(er) noise
- Fills and loops (phrase sampler)
- Backing tracks
- Controlling the volume
- Midimode: polyphony, channels, connectable devices
- Keyboards with drumpads
- Note mapping, retuning, keyboard split
- Topology: integrate your midi device in all these mappings
- Multi-timbral channel map
- SMF-player (simple internal sequencer)
- Note generation, common 12-tone and 24-quartertone scale
- Effects & audio filters
- Tweaking the WebGUI
- its sound (ofcourse), but also it's envelope, being:
- the force and the way it builds up to volume when it starts (attack)
- the way this attack goes down to steady volume (decay)
- the way it keeps the volume while the key or sustain pedal is still being pressed (sustain)
- the way the sound fades out when the key or pedal is released (release).
A synthesizer generates it's sound via tone generators, mimicking instruments by via their characteristic envelopes.
- When a controller is hit (say a key on the keyboard), this results in a note-on signal with the force this key was being hit (or the pad was struck, whatever controller...).
- After that the force that the key is being held (aftertouch) is sent in separate messages. Aftertouch is not supported in samplerbox.
- On a drum midi controller the "keypress" will be extremely short, therefor you can usually program the gatetime: "the time that the key is supposed to be pressed" (ADS).
- When the key is released a note-off is sent, and the release / sound fadeout starts
- Pressing the sustain pedal makes the sound continue even after the key is released / gatetime is exhausted. Releasing the pedal starts the release fadeout.
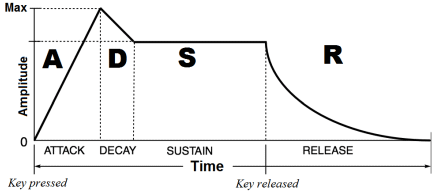
The lines are usually not straight, the AD-form actually characterizes the instrument. Also the S-form differs per instrument,
on a piano it will decrease but an organ will have a horizontal line.
Sampler
Instead of generating the characteristic sound, a sampler uses pre-recorded samples to do (part of) the job described above.
Samplerbox reads these samples from WAV-files and plays them depending on note-on/note-off and force=velocity the key was hit.
Playtime depends on the mode: in keyboard mode a note-off is processed when releasing the key (which can be delayed using the sustain pedal),
in all other modes the WAV-file will be played till an explicit (non-MIDIstandard) note-off is sent.
For a straight forward WAV-file this means that if (in keyboard mode) you hold the key shorter than WAV-length, the built-in release/fadeout will start before the recorded release.
Subsequently, if you hold the key longer than WAV-length, the built-in release/fadeout won't have any effect as the WAV-file is exhausted.

This gives good results for an instruments that fade out by nature like the grand piano or acoustic guitar, but won't work for a flute or organ.
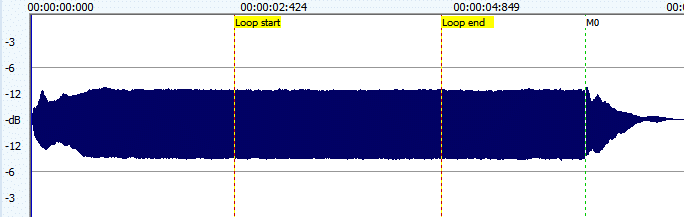
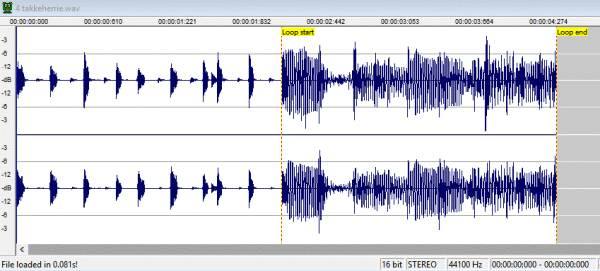
By using loop markers (the red lines), you can you can fix that like this:
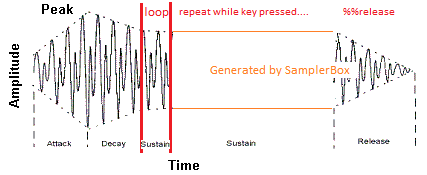
The WAV file processing actually ends at second loopmarker, the rest can be generated by samplerbox.
Now the sustain can be as long as needed and release/fadeout is by default controlled by built-in release/fadeout,
which can be configured on box level,
per sample set and individual sample(s).
When using this method, the files can be truncated after the last loop marker.
If the attack/decay is not applicable for this instrument/sound, loop markers can be at file start/end, making things very easy.
The samplerbox default saw sample illustrates this.
Velocity level differentation in samples
- TL;DR:
Samplerbox has default velocity_levels=1 and velocity=accurate to support playing volume = "touchez"
If you have samples with more velocity levels:- Use max 4 of them for the natural sound of the instrument - yes this is sufficient !
- Normalize them = make them all have the same volume
- Use parameter %velolevs=4 (or 2 if you have only 2, using 3 is useless as it will result in 4) on the sample definition lines
- Use the appropriate %velocity= parameter per sample definition line (where %velocity=1 is the lowest).
- Full explanation:
Original samplerbox used the %velocity=<number> to select the sample belonging to the velocity range within the total of 127. With this technique, 5 to 7 samples=wav's are needed to achieve a realistic estimation of the force the player plays and the resulting volume+sound.
To realise this, it expanded all input to a set of 127 velocity levels, filled according to the levels/ranges read with missing levels to be generated redundantly.
Works ok, but I dumped it.
With parameter %velmode=Accurate (now default) the volume will change in 127 steps according the players force + capabilities of the keyboard, while using the same sample (=you'll only need one of the maximum volume).
Sounds good eh? ... well, it can be better:
When an instrument is played with varying force, it's sound will change because of the physics/mechanics; not only the volume changes from low to high, but also the nature changes from soft to hard.
As this is more subtle, you don't need so much velocity levels: depending on the instrument, 2 to 4 will be sufficient in my experience.
NB: as the volume is controlled directly from the players force, the samples need to be normalized = low velocity levels need to have their max volume at the same level as the high velocity (they are needed for the sound only, the samplerbox takes care of the volume).
To reduce sample load time and memory usage, you can eliminate the level redundancy with %velolevs=<number> parameter.
This parameter defaults to 1, as most samples are not such high quality / multilevel (and not all instruments have this behaviour).
Of course the %velocity=<number> value needs to be consistent with that = cannot exceed %velolevs=<number>.
Sampled release
The builtin release is not always sufficient. With a harpsichord you need the sound of the damper, with a church organ you need reverb/noise of the church etcera.
This can be achieved by sampling/recording the typical release sounds too.
At playtime the sample will be played as described in previous paragraph, but when the note off is received the release recording will be mixed/played instead of the built-in synthesized release:
- For a damper noise effect like harpsichord: at note off the "normal part" needs it's release processing for the natural ending, mixed with the damper noise. You hear the damper while the sound dies quickly though not abrupt.
- For an environment effect like church organ: at note off the "normal part" needs to be replaced by / glued to the release recording. This is quite hard to get right - I personally find it easier (and good enough) to add some reverb and echo to get a natural perception, I agree however this is not the real thing.
- Lots of fun things are possible when you start thinking out of the area of natural instruments...
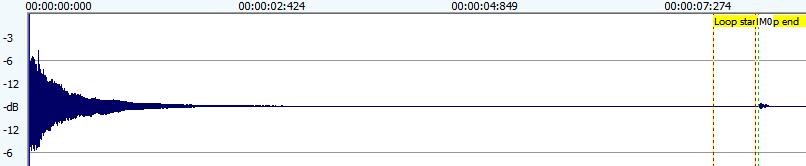
- Embedded (the Grandorgue method):
The release recording is at the end of the sample, indicated by a marker (Mx). This straightforward to record and define.
The sample needs to have loop markers (could even be a short dummy pair) before the release marker to prevent accidental confusion.
When the note off is received the sample will jump to / start play from the last marker found in the sample (after the loop markers), ignoring the part between last loop marker and the Mx marker, but performing the xfadeout procedure.
If there is no marker, then the builtin release will be executed instead of the jump & fadeout. - Separate:
The release recording is in a separate wav. These samples are identified in the sample set by the negative value of the voice (the release samples of %voice=2 are in %voice=-2).
No requirements for loop and/or release markers, nor do the wav's have to be in identical range; the note filling will expand both voices in the usual way.
When the note off is received the sample will jump to / start play the release sample, while performing the xfadeout. If there is no release sample, then the normal release will be executed.
- xfadeout: time that running loop has to fadeout (comparable with release). This depends on the instrument. For a harpsichord it should have the normal release value as the release sample does not produce release but just the damper noise.
- xfadein: time the release take to get in (this can be very short, but is necessary to avoid the start click).
- xfadevol: the relative volume (like gain) of the release part compared to the loop volume. Normally this is 1.
Harpsichord embedded release sample: a superficial loop is just before the damper sound, so we have the natural delay as long as possible.
Random samples per note for human touch or plain fun
All the above is meant to get a "close to real" sound.
However it does not take in account that for some instruments the way it's played can slightly differ during play as humans are no robots.
Think of the position where a drumhead is hit, the exact position of the fingers on a fretless instrument, the snare position where dulcimer family instruments are hit, etcetera, etcetera.
Same drum, same snare, same velocity but still other sound - the human touch.
The %rnds=<number> parameter gives the possibility to assign multiple wav's to every note/velocity pair.
The assigned wav's will be selected randomly during play.
The numbers are in range 1-9 and don't have to be consecutive or sorted; they just have to be unique for the selected note/velocity.
Do make sure you supply the same velocity layers for every sample(wav), otherwise notefilling may surprise you with undesired effects.
This parameter is ignored on the separate release samples; they are united with the master sample. This means that every %relsample=S line needs a mirrored "%voice" line.
If you have less release samples, you need to point to a shared wav for this. Don't worry: it will be loaded only once.
If these wav's are same note+velocity of the same instrument but differ in the "touch", this will introduce a human like element.
But ofcourse it's perfectly possible to make more creative / mind boggling options via assigning different instrument wav's this way.
Mutegroups = one note at a time per group
In samplerbox mutegroups are used to define groups of notes of which only the last played will sound.
Logic: if a note in in a mutegroup is playing and the next in that group is activated, the existing one will get a note-off.
This introduces a configurable "MIDI Mono Mode": if all notes in a voice are in the same mutegroup, you have the basic MIDI mode=mono.
This is for instance useful for the once and loop modes as you can make ongoing sounds that will be switched when playing a new one (or stopped if playing the same one).
Another usage could a be simplified drummer's Hi-hat.
The "note" is the note/key played by the musician.
So if autochord is on, all notes in the chord wil be played.
When the musician plays a new note, all the old chordnotes are stopped and we'll get the new chordnotes.
It's defined via the %mutegroup=<number> parameter.
Sustain and damper pedals (or knobs)
Sustain simulates keys being pressed (=suspended note-off) untill the pedal releases them all. In default operation, playing an already sustaining note will cause an artificial note-off while doing the new note-on to minimize noise / unwanted volume increase.
This is undesired when simulating the natural resonance of some acoustic instruments (it makes the grandpiano sound "thin"). Preserving resonance can be achieved by setting the %retrigger parameter to "Y".
Sustain shows another typical difference between instruments fading out by nature and those capable of holding tones as explained above: instruments having a loop are incompatible with "%retrigger=Y", hence the default...
The sustain pedal has no function when playing in mode=once; you can consider this mode as mode=keyb with a "locked" sustain pedal.
Damper does the opposite: it quickly damps the sounding note, even when the key is still pressed. New notes sound muffed / pizzicato like. You may have to experiment with the %damp parameter.
Three types of damping (pedals) are available via the CCmap:
- "Damp": all sounding notes are damped and new played ones sound very short ("damped")
- "DampNew": only the new notes are damped. This gives a nice kind of pizzicato effect over the ongoing previous notes (both held or in release state).
- "DampLast": notes played while the pedal/controller is pressed, will be damped when the pedal/controller is released. This mimics the effects of a player muffing the last played snares with his hand, while the resonance of previous notes is still continuing (assuming %retrigger=Y). This is a technique for instance used by santoor players, but I've also seen grand-piano players reach for their snares.
- Notes:
- Using a mix of sustain and damp(s) at the same time is technically possible, but requires awareness of what you are doing. For instance Sustain+Damp just kills the sustain, but you may get a nice result with Sustain+DampNew.
- In samplerbox the sustain and damp are implemented as a continuous controller, using value 0 as "off" and anything other as "on". This way the usual pedals (using 0="off" and 127="on") and half damper supporting pedals (using 0="off" and other values the pedal levels) can be connected as is. However the actual coding only supports on/off, so the half damper functionality cannot be used (yet).
This relates to previous two paragraphs.
When using damp you may want hear extra sounds (like the damper sound at noteoff for a harpsichord).
Think of pianists reaching in their piano to damp snares or above santoor player hand-damping the last played snares (the santoor is a mode=once type of instrument), both causing extra noises / rattling effects.
It can be set with %dampnoise=Y.
- it can only be used this in conjunction with the release sample.
- it uses the same sample (= release and damp noise will sound the same).
- if it's off and you damp for instance a church organ with sampled release, the full (note+release) sound will be damped.
(not feasible with the real instrument as it doesn't have a damp pedal, call this an "SB feature" :-) ) - if it's on and you play that church organ with pressed damp pedal, you will only hear the church reverb.
In the "Once" modes, the samples will be played once till end of file. With "Onc2" you can force it to stop (with release=fadeout processing) by pressing the same note again. These modes are meant for special effects, background vocals, short rifs or fills etcetera.
"Loop" modes recognize loop markers. You can use this for a repeating riff, bass-loop, etcetera. Without loop markers, the sample will be played once obviously; you can use this when a mix of loop and once phrases is needed.
Note: as a loop needs a way of stopping, it will either operate in normal "stop on same key" mode or special "stop on 127-note".
A complex example to illustrate what is possible:
This shows an intro/fill followed by a backline loop.
We use it in fact by starting it and subsequently stopping or restarting just before the loop starts to get some sort of countdown effect.
When letting it go to the loop part "the music starts". This can be repeated several times.
With this we emulate two extra musicians who will play their part on request (keypress or pad-hit).
By the way: using such an intro mechanism enables to sync with the loop without a click track.
Stopping the loop or phrase
In Loop and Onc2 modes the playing stops by hitting the key a second time.
Mind that this second hit is always necessary: if a Onc2 phrase stopped by reaching it's end, it still needs the second press before it will play again.
So this is really "press twice"
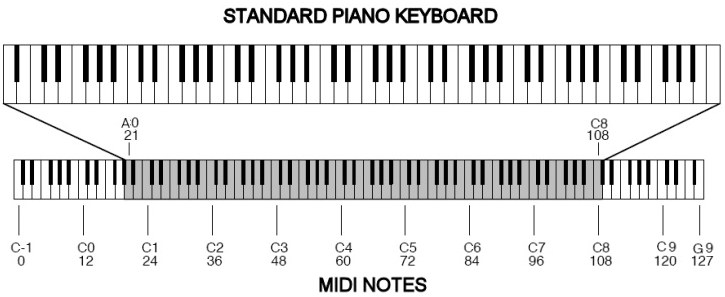
For loops, a special way of stopping is by hitting the midinote calculated by 127-note.
Table at the right shows exact values, also highlighting standard keyboard areas (these do not exactly match the playable areas that can be defined with %%stopnotes).
"Loop" works only for notes in the "start-stop areas": the note=sample played to left of the keyboard area is stopped with it's mirrored values to the right of this area.
See picture below for illustration of the usable areas using an 88-keyboard.
You can set the areas by defining the first stopnote (start of the stop=right range). Default is 109 = the first available note next to the 88 range.
With this you can stop samples 0-18, leaving 2 slack. Within the "keyboard area" (between the start-stop areas) samples defined as "Loop" will be forced to "Keyb" to avoid infinite loops.
Backing tracks are a special type of loo2 meant for providing musical accompaniment. Main characteristics:
- Always located in the effects track (voice=0), implicating:
- available in all tracks/voices
- no notefill
- no pitch adjustement
- You can assign a controller and/or a note for (de)activation.
- The end signal is the next press of controller or note that started it; behaviour depends on the sample:
- If the sample has no loop(markers) it will stop instantly.
- If the sample has loop(markers) the sample will play till loop-end and from there continue till the sample-end.
If the end signal is received again, even this play "playing to end" will stop instantly.
- They can be given a name for easy identification in webgui or display.
Mastering volume is not just turning the volume knob; we are connecting a series of (virtual) inputs and outputs and need to achieve optimal connections.
- The WAV's on your stick/card have a certain volume.
- You play with a certain volume (velocity), can be multiple notes/chords increasing the load.
- The resulting input value is fed into the PI audiosystem, but:
- If it's too much you get distortion (see complaints in the forum, this is it).
- If it's too low you won't hear enough and boosting the volume afterwards may result in white noise.
- And ofcourse you don't want big volume differences when switching sample sets.
- The PI audiosystem will feed this into DAC (Digital to Audio Converter), commonly addressed as "the soundcard".
- The audiosystem output can be too much for the DAC.
Use command line "alsamixer" to check when it "goes red": choose your soundcard with F6, experiment a bit and use the allright value for the "volume" parameter. This is the percentage shown in the display.
In the configuration.txt you can then set a default value. - The output of the DAC can also be too much for the next link in the chain: the mixer/amplifier you connect the samplerbox to.
For temporarily adapting this default (for instance in a stage environment) the GUI or physical buttons can be used. The optional display will show the resulting value, so this is also tuning method.
And yes, some USB audio interfaces also have buttons for this and ofcourse professional mixers have gain control to adapt it on their side. Take your pick :-)
- The audiosystem output can be too much for the DAC.
- Last but not least: while playing you may want to adapt the overall volume without using these hard-to-reach buttons. This can be done via your midi controller using the volume knob/slider or equivalent.
Using this will keep the balances as tuned/adjusted with gain and output volume intact, while giving you control over the master volume. Initially you have to touch it once, so the samplerbox knows the position of the knob/slider. It will then be preserved when switching presets.
SamplerBox merges all input to one MIDI link. In plain words: it can "see" all devices connected to it no matter whether they are connected via (multiple) USB input or the optional DIY wiring on the serial interface on the GPIO pins.
- The default/unspecified devices are treated as what the MIDI standard calls "omni off, poly on" device.
This means: they have to send all messages/notes via one specified channel which is treated as a "master channel".
This is defined via the MIDI_CHANNEL parameter in the configuration.txt.
Via voices, the Note mapping and drumpad extension, samplerbox itself behaves as an "omni on, poly on" device. - For devices explicitely defined in the MULTI_TIMBRALS list in the configuration.txt,
the note-on, note-off and program change messages are received in 16 channels identified as #1-16 which can be assigned to sounds via the
Multi-timbral channel map next to / mixed with the sounds of the "master channel".
Other messages (such as CC's) are ignored, so you can play multiple instruments independently but you cannot control any effect (this is the "master's privilige").
In the perfect world, the master's effects should leave the multi-timbrals natural, but alas "mixed sound" effects will influence this input (see Effects & audio filters).
Bottom line: using this technique, you can have omni-on devices for playing notes on different instruments at the same time. Sequencers are an example of omni-on devices. - A combination can be made via the MULTI_WITHMASTER list in the configuration.txt. This defines devices behaving as master via the defined MIDI_CHANNEL and behaving as multi_timbral via the other 15 channels. You can also interpret this as "MASTER_XL".
Implementation is not exactly implemented as described in the midi standards: instead of refusing new notes exceeding MAX_POLYPHONY, the eldest triggered tones will be removed (playing backtracks will be preserved regardless their age).
When using autochord / chorus / layers, the extra needed notes needed for that are included in the polyphony count. For autochord this depends on the chord definition (usually it means 2 or 3 extra notes) and for chorus it's 2 extra notes.
On turn these values are multiplied with the layer count. So a 3 note chord played with chorus on a 1 extra layer voice results in 3*3*2=18 sounds to be played with one note-on. Be practical with your creativity..
With Mutegroups you can emulate the midi "poly off" by defining all notes in the same mutegroup.
Samplerbox supports the rarely used real time "reset" message with the more common "all notes off", also known as "panic button".
Keyboards with drumpads
Some keyboards have drumpads coming in different flavours, some having some restrictions: hardcoded on the channel (drumchannel=10), hardcoded on the notes per pad, etc.
Optionally samplerbox can "route" notes from the drumpadchannel to other notes in the master channel.
- Before digesting below: if you can configure your pads to send configurable notes (and/or CC'S) via the master channel, just use that - below is a software workaround for pads with limitations for configuration.
- Parameter DRUMPAD_CHANNEL in the configuration.txt
defines the drumpad channel (usually 10).
A valid midi channel (1-16 other than master, so usually 2-16) enables the feature.
If enabled, note-on / note-off messages of the pads will be processed.
Additionally you can enable processing of programchange and CC-change. - Optionally the routing can be defined in the keynotes.csv
to avoid conflicts with keyboard notes:
- third column "Optional drumpad midinote" defines the note sent by via the drumchannel
- the second column ("Midinote") defines the note to be received in the master channel. - Making it work can be via samples directly assigned to these notes or via the magic of note mapping, which also allows you to assign a controller function to the pad making it an extra button.
- Ofcourse his feature can be used for other devices to achieve sort of "omni on" input mixed in the master channel.
This is a technique to make keys playing notes other than the standard ones
(transpose/retune per played note and/or switch voices).
This can be done predefined/sampleset via the notemap.csv
or the webGUI screen - looking at those saves pages of explanation here.
It drills down to: per note you can define what actual note&retune should be played and which voice to use.
- For the basic keyboard split you define the left side of your keyboard to use some voice and the right side to use another voice - but more sophisticated stuff is possible.
- You can redefine the complete range to use a 12-tone device for the 24 tone scale) (the demo set contains examples).
- ..etcetera..
- You can even assign a controller function to a key making it an extra button, see next paragraph...
   +-------------------+     +--------------+
   | controllerCCs.csv |     | keynotes.csv |
   +-------------------+     +--------------+
             |                      |
             V                      |
     +---------------+              V
     |   CCmap.csv   |     +-----------------+
     |       &       | <-> | set/notemap.csv |
     | set/CCmap.csv |     +-----------------+
     +---------------+
controllerCCs.csv and keynotes.csv
are meant for labeling the controls (knobs, sliders, buttons) and
midi note triggers (keyboard keys, drumpads) of your midicontroller.
This way you integrate them into one system.
In other words: you give them a name, so you can attach/map them to samplerbox via
- CCmap.csv to use the various effects via your device controls
- notemap.csv to do non standard things with your keyboard or drumpads.
The most standard controls (volume, program up/down, pitchbend and such) as well as the standard 88 midi keyboard are already in the distribution.
You'll also find some specific mappings I'm using on my equipment. You can just ignore/delete/replace those; I've left them in as examples.
When samplerbox starts it will add the notenames as defined in keynotes.csv to the values read from the controllerCCs.csv as available controllers.
| ||||||||||||||||||||||||||||||
- The controller name is this notename
- The CC of these notes is defined in the configuration.txt via NOTES_CC
- The Val is the notenumber (so C4 sends CC=60, but this is transparant for you)
- All this to facilitate the "Ctrl" in the notemaps
That's a hard to read sentence, so on the right an example: use the leftmost key of a 61 keys midi keyboard to switch reverb on/off in a sample set.
Consult the README_CSV.txt in the configuration directory for more details.
If you want have this activated by default in this sampleset, include %%notemap=mapname in the definition.txt. Multi-timbral channel map
|
With this technique you can assign default instruments in the channels of the multitimbral input devices (for instance a sequencer) to the desired voice=sounds.
This is defined per sampleset via the MTchannelmap.csv shown on the right (via the webGUI screen is on my wishlist).
Set is either:
- 0 = default/fallback to use if the active external device or file played by internal device is not specified.
- the name the midifile played by the internal sequencer without the '.mid' extension.
- the name of the sending external device (the name between quotes in the 'Opened "<device name>" as MIDI IN <number>' console message in debugmode).
Channel# and program# are the "human counts", so channel range 1-16 makes GM-piano=1 and GM-drum=10, but your controller may be zero based (range 0-15 and 0-127), which may be confusing. SMF files are zero based by definition, an attention point when debugging.
Specifying value=0 gives the default/fallback for undefined channels/CC's in this set. If this results in a voice for which no wav's exist, samplerbox assumes the lowest voice present.
Midi player (simple internal sequencer)
Wikipedia states in the "Composition" paragraph:
"MIDI events can be sequenced with computer software, or in specialized hardware music workstations. Many digital audio workstations (DAWs) are specifically designed to work with MIDI as an integral component. MIDI piano rolls have been developed in many DAWs so that the recorded MIDI messages can be easily modified."
....<snip>....
"The data composed via the sequenced MIDI recordings can be saved as a standard MIDI file (SMF), digitally distributed, and reproduced by any computer or electronic instrument that also adheres to the same MIDI, GM, and SMF standards. MIDI data files are much smaller than corresponding recorded audio files.".
SMF's in the active sampleset can be played by samplerbox (one at a time!):
- Set 'USE_SMFPLAYER' to 'True' in the configuration.txt
- the internal smf-player is now added to the multi timbrals
- the SMF's will be recognized by their ".mid" extension - For every SMF you need a line in the definition.txt with a unique %smfseq parameter.
The simplest form: "%smfseq.mid" if your files are named 1.mid, 7.mid etc..
More human friendly: "mysong.mid,%smfseq=1" - this is linux, so the name is case sensitive !! - You can assign this number to a control on your midi device via CCmap.csv
- An SMF is started by toggling the SMF number with the assigned control
- Any looping can be toggled with the SMFloop assigned control
- Playing can be stopped with the SMFstop assigned control
- if not looping, it will stop immediately
- if looping, it will stop after finishing the loop; a second press will stop immediatley - The instruments/sounds assigned to the programs(changes)=instruments in the channels are by default assigned to voices with the number of the program change within the channel:
range 1=piano to 128=gunshot (so not the internal 0-127 range). If this voice is not in the sample set, the first/lowest voice is used.
This behaviour can be changed via the Multi-timbral channel map, The filename without the ".mid" extension is used as identifier for a dedicated mapping / song.
When loading the sample set, the program changes in the SMF's are inventorized per channel, where channel 10 is assumed to be the percussion channel causing used notes to be inventorized too.
Inventorized information is displayed on the console and kept in tables for later use in the UI's.
Note: so it is useful to make a voice>128 for storing the percussion sounds and creating at least an MTchannel map entry for percussion - There is an SMFtempo control, but don't rely on it as it's only working in short sequences.
If it works it's always ok, if it doesn't you always end up with tempo changes at (consistent) later times which is unworkable; ALSA sequencer doesn't seem to behave as documented.
Only reason I haven't removed the option: sometimes it works, giving possibilities I really like. Up to you....
By default (%fillnote=Y) missing samples will be mimicked/calculated from the nearest note. If this exceeds programming boundaries, the ultimate note will be used ("it sticks at the border...").
Theoretically this implies that one middle C sample can facilitate large keyboards, however in real life this will not sound nice.
The number of samples/octave depends on the instrument: the saw is OK with 1 sample/octave while a piano needs 4.
Note 1: Generation is actually done by varying the speed, so unusable if the tempo of samples/loops is important.
Note 2: Original samplerbox calculates from the lowest sample upwards. Biggest downside: notes below the lowest sample are dead.
Note 3: I've also increased the granularity of speed to enable pitchbend, 24-tone-scale, retuning and 48kHz support.
Default described above is done for the common 12-tone standard (7 tones plus 5 semitones per octave), see 88-keyboard frequencies and full layout.
By specifying %qnote, the note generation will also produce the in-between quarter tones, resulting in 24 tones per octave.
The standard midimapping of midi notes to music notes does not apply here anymore of course.
Basis of the mapping is middle-C = midi 60 = music C4 (unless changed in the script..), giving these values for 24-tone scale.
Straight filling the notes results in equal temperament, which does not always fit the Eastern music & instruments: they may need retuning.
Options for retuning these notes are
- %qcent will generate the q-tone via a fixed scheme by giving a value other than 50 cents.
- The retune parameter in the notemapping on a "per note" basis.
- In the GUI for doing this retuning interactive.
Wiki description of samplers states "Often samplers offer filters, effects units, modulation via low frequency oscillation and other synthesizer-like processes that allow the original sound to be modified in many different ways."
Implementation on a Raspberry sets limitations to this, so it had to be done as performance friendly as possible which resulted in trade-offs in some areas. As the effects are applied at their most efficient stage in the sound generation process, there will be aggregation differences. In plain English: the scope where effects are effective may not always be logical/consistent from musicians point of view.
- The three scopes:
- Notes/tones in the keyboard area
- All 128 notes/tones except the effects track (voice=0)
- All notes/tones/sounds, thus also including backing tracks and multitimbrals.
(principally effects should only affect the "main" device's sounds, but alas..)
Per effect the scope in which they operate as well as how they influence performance:
(the process stage is mentioned for the curious...)
| Effect | Scope | Process stage | CPU impact |
|---|---|---|---|
| Sustain&damp | Notes in keyboard area | Note-on/off processing | Low |
| Pitchbend | All notes except effects track & MT input | Tone generation | Low |
| Vibrato | All notes except effects track & MT input | Tone generation | Low |
| Tremolo | All sounds | On mixed sound | Low |
| Panning | All notes except effects track & MT input | Tone generation | Low |
| Rotate | This is vibrato + tremolo + panning | Low | |
| Wah (all types) | All sounds | On mixed sound | Medium |
| Delay (Flanger+Echo) | All sounds | On mixed sound | Medium/low |
| Moog low-pass | All sounds | On mixed sound | High/medium |
| Reverb | All sounds | On mixed sound | High |
| Overdrive/distortion | All sounds | On mixed sound | Medium/low |
| Peak limiter | All sounds | On mixed sound | Medium/low |
| Arpeggiator | Notes in keyboard area | Note-on/off processing | Low |
| Autochord | Notes in keyboard area | Note-on/off processing | Varies from low to medium depending on speed of playing |
| Chorus | Notes in keyboard area | Note-on/off processing | Varies from low to medium depending on speed of playing |
| Retune | Depends where applied | Tone generation | Low |
| Backtracks | Effects track | Note-on/off processing | Low |
Tweaking the webgui
Tweaking the gui requires some knowledge of HTML and optionally also knowledge of CSS (style sheets). Just looking at the pages may give you enough information for a quick start.
For a better understanding a brief introduction on the setup and way of working follows below - you may decide to skip that and only use the list of building blocks.
Keep in mind this is 'living' documentation: the actual status is listed on your distribution via the readme screen.
The webgui uses a very simple http server returning files in the webgui subdirectory tree (pages, stylesheets, scripts, pictures, etc)
with an addition to pass internal samplerbox variables to your webbrowser and process any input returned (like a REST API).
In short: /root/SamplerBox/webgui is the webroot of a specialized embedded webserver.
Communication flows down via the generated SamplerBox.API in cooporation with stored script SamplerBox_GUI.js and flows up again via the standard submit of your browser.
Your browser renders these pages as usual and makes them look prettier with stylesheet SamplerBox.css.
The distributed pages are created for use with 7" tablets in portrait..
             +---------------------+         +------------------+
             | S a m p l e r B o x |  <===>  | tablet/PC/mobile |
             +---------------------+         +------------------+
                 |            ^
                 V            |
  +------------------+    +----------------+
  |  SamplerBox.API  |    |                |
  +------------------+    |   index.html   |   +----------------+
            |             |      and       |<--| SamplerBox.css |
            V             |     other      |   +----------------+
  +-------------------+   |    webpages    |
  | SamplerBox_GUI.js |-->|                |
  +-------------------+   +----------------+
In order to make the above work, every webpage needs to include in the header:
<LINK REL="stylesheet" TYPE="text/css" HREF="SamplerBox.css">
<script SRC="SamplerBox.API" TYPE="text/javascript"></script>
<script SRC="SamplerBox_GUI.js" TYPE="text/javascript"></script>
as well as activation at the bottom (before the </BODY> tag):
<script>SB_Update();</script>
The "SamplerBox_GUI.js" contains building blocks for generating the html code to show and update variables (via tables, dropdowns, sliders, etc) in the webpages.
So you don't have to bother with the technical part of the interface and/or write lengthy html code.
In general building blocks for R/W variables are referred by "input_SB_<var-name>" and for R/O variables/elements by "elem_SB_<var-name>".
They are "called" by using ID parameters in html tags (<span>, <div> etcetera).
These tags can often contain text, which is displayed together with slider / dropdown / button, whatever is appropriate for his particular variable.
The R/W elements must appear between <FORM ID="elem_SB_Form" STYLE="line-height:300%;"> and </FORM>> statements.
Almost all R/W elements have an implicit submit, making the samplerbox react instantly to changes.
The above is very brief, please use the distributed pages as examples. The readme.html contains also a more direct way to access the variables.
The exceptions on implicit submit are all in these distributed pages; you can recognise them via the "set" buttons.
Ofcourse it is possible create alternative building blocks. I suggest to use extra scriptfiles for that and leave the SamplerBox_GUI.js alone as it is integral part of future distributions forcing re-applying local changes if any.
I will gladly include improved blocks in future versions, just let me know.
The html pages can be changed, deleted or extended at your convenience, likewise for the SamplerBox.css.
If you have suggestions - or even better - make improvements on look and feel, please don't hesitate to let me know!
The building blocks at time of writing these docs:
|
Please look at the GUI and in its html sources to see what these blocks do. The dictionary at the bottom of UI.py gives specs in very rudimentary way. I figured that to be more effective than trying to describe it all here. |
This is now in the FAQ