|
Making other types to fit your requirements
The image now supports up to at least 3B+.
Configuration has become easily adaptable, so there are various options without need for hacking:
- PI audio
- USB Audio
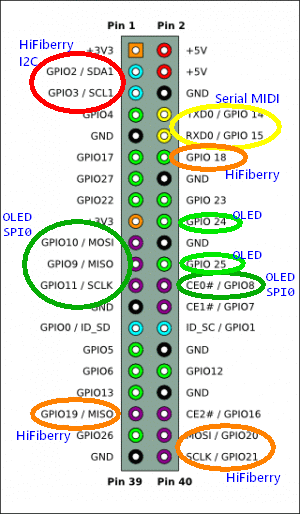
- I2S audio = HiFiBerry compatible high fidelity DAC / "audio hat"
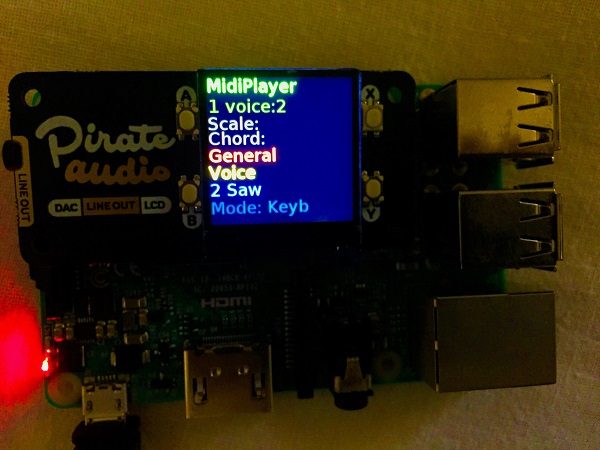
- Pimaroni Audio Pirate (I2S audio, a color LCD and 4 buttons)
- I2C 7 segment display
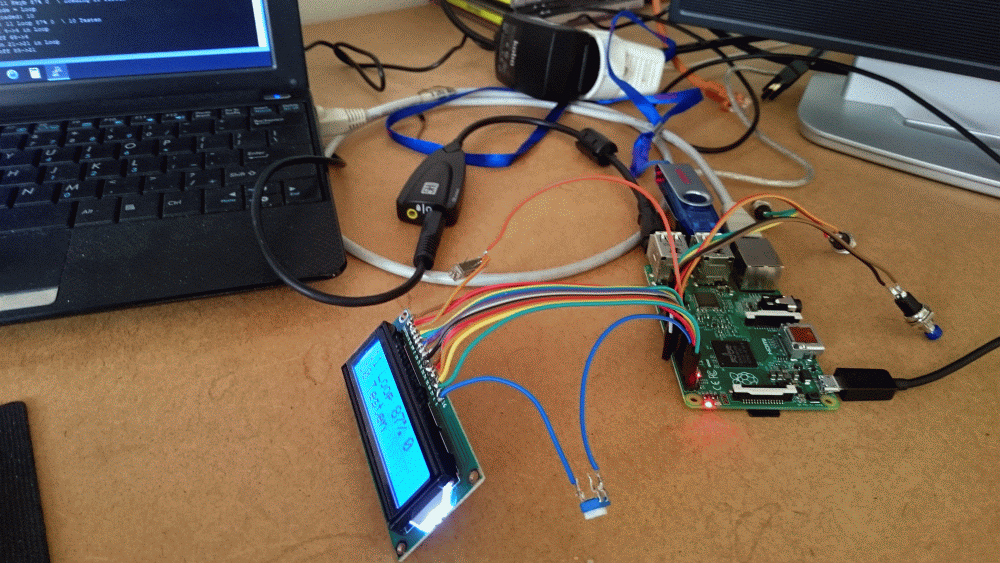
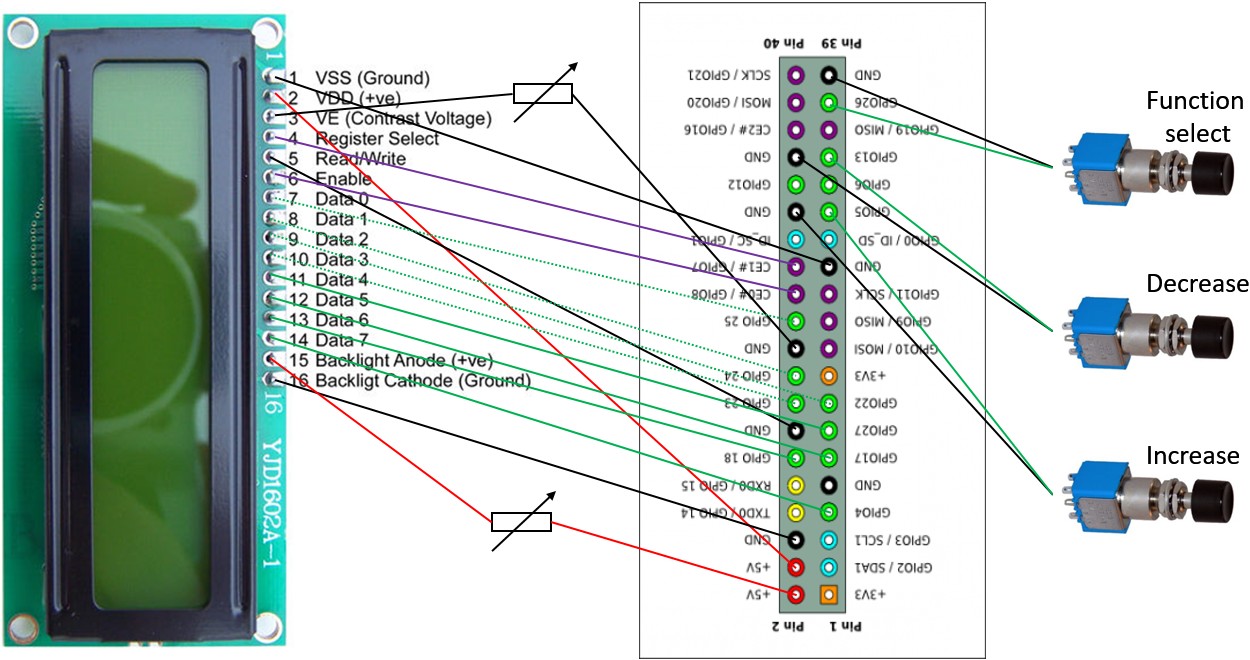
- HD44780 compatible LCD display's (direct GPIO like in the trial as well as
I2C).
The coding for the I2C version supports a 4 line display.
- 128x64 OLED display: SSD1306 & SH1106(with buttons) via SPI
- LED indicators
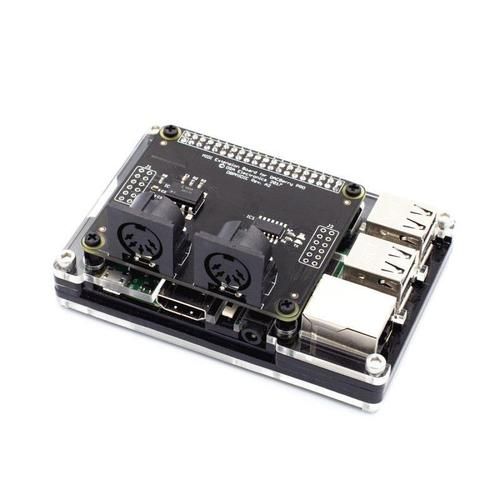
- DIN cables support using a midi board
or DIY direct midi.
- Single-board microcontrollers like Raspberry Pi Pico and Arduino.
For such boards there are multiple options by nature :-)
- If board uses serial MIDI, they are "just midi devices".
Being at this level of DIY, you could even go for
direct connecting the serial interfaces
of the two (with optocouplers if still needed) to create an efficient one-box solution.
- If board uses USB, they may connect to samplerbox using the USB port as a mix of
midi device as well as a storage device (similar to a stick/thumb-drive containing samples).
Samplerbox can't deal with multiple usb storage devices (yet).
The bypass for now: if a the usb connected usb storage does not contain sample sets,
samplerbox assumes "no USB samples" and takes it's samples from SD storage -
in short: samples on stick are impossible.
Royal solution: enhance the microcontrollers logic (they usually have a boot selection button)
to disable the storage device behaviour when functional.
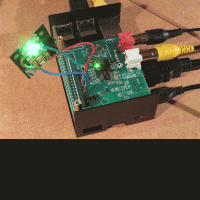
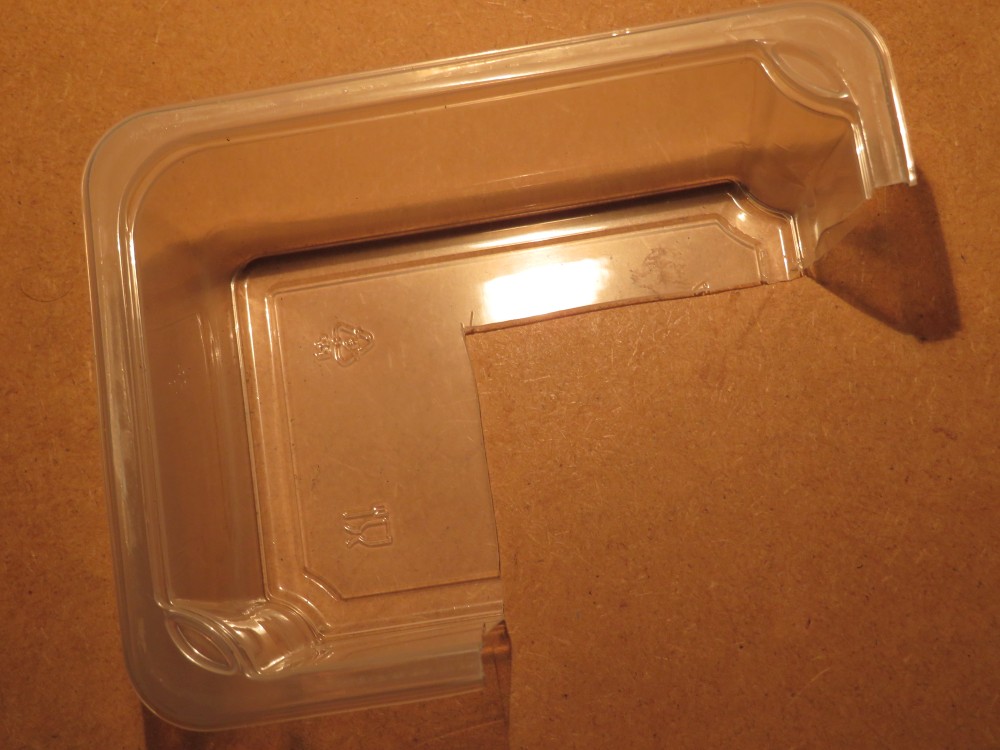
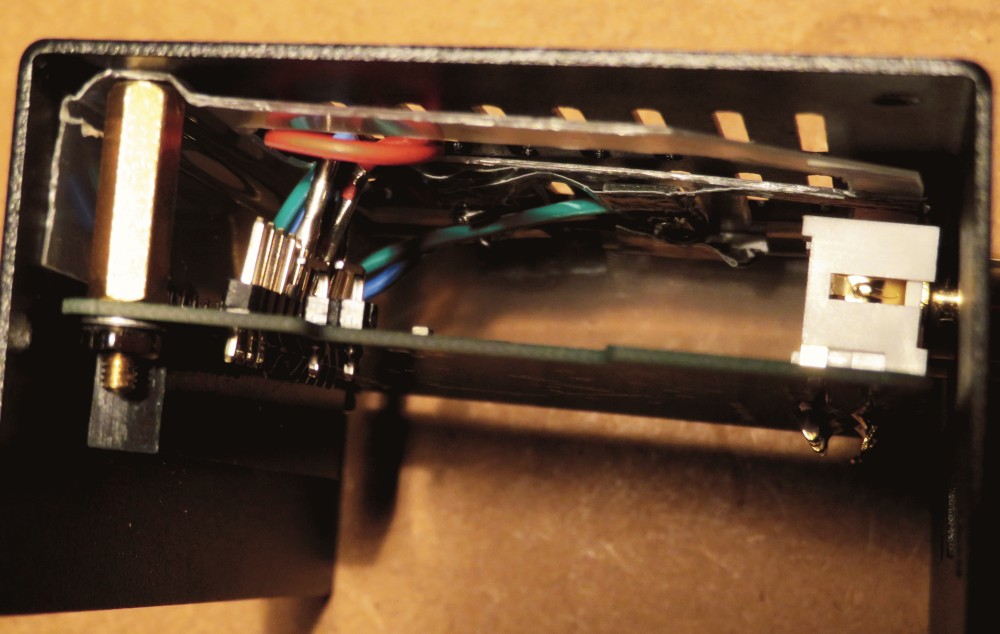
Our band is now using a PI3-B+ with HiFiBerry and indicator LEDs, boxed in a standard HiFiBerry metal case. So the DIY drilled down to solder extra header (mind to use "Short Feather Male Headers" as the space is limited) on the HiFiBerry and attach two LEDs from an "Adafruit LED Sequins - Multicolor Pack of 5" (they have builtin 100 Ohm resistors, so no extra components necessary). See pictures on the right for inspiration.
I had to remove the plastic cover from the jumper wire connectors to make them fit between header and box; space was 2 mm short on my RCA version. The XLR version will be easier in this respect as well as be more robust.
Things making a man humble: the biggest challenge was to get the LEDs solidly positioned under the heat openings, while keeping those open. Solved with a corner part of a leftover plastic wrapping pinned between two spacers and case and duct tape on strategic points.
On request I've introduced the "USE_48kHz" parameter in the
configuration.txt
to support 48Khz DAC's not supporting 44100Hz, see FAQ for more details.
Commandline access and debugging
As samplerbox is a stripped but basically normal Raspberry implementation, so:
- Direct acces via USB-keyboard and display (HDMI or video) if plugged in before poweron, should always work. If it doesn't, either your SD card is corrupt, your PI is not supported (or broken, but that's rare) or the HDMI cable is poor (yes, I've tested that by coincidence).
- Remote access is possible via available network connections
(see GUI usage) with ssh.
The ethernet(cable) port is default configured to receive its address from the network it connects to
and will publish its hostname(samplerbox) to the dhcp/dns network device.
If "samplerbox" is not found, you may have to use the assigned IP-address.
See the FAQ relating to IP-address if you have trouble connecting.
If the wifi port is used as hotspot, it should be connectable as "sampler.box".
If your PC however has multiple active interfaces, you may need to use IP-address 10.19.59.3.
If the wifi port is not a hotspot, rules of the ethernet(cable) apply.
- SSH software for console access: PuTTY (etc..) and the linux ssh command.
- SSH software for file transfer: WinSCP, Filezilla (etc..) and the linux sftp command.
- In all cases: uid=pi, pwd=sbox gives you access to the commandline of the linux system.
You can stop the automatic running script with sudo systemctl stop samplerbox
All filesystems are mounted read-only to allow blunt poweroff and removal of USB storage.
To get the partitions in update mode:
rw
  .. and if USB storage is present:
sudo mount -o remount,rw /media/usb
A shortcut for all above (stop samplerbox, get SD partions writable) is command
devel
Returning to readonly mode can be done with command "ro".
Mind that having a filesystem in RW mode requires the box to stopped with a poweroff (or reboot) command to avoid corruption.
The prompt will show RO/RW status.
Also mind that the samplerbox's internal clock is out of sync on every (re)boot,
so if you want your file time stamps to be correct, you have to set the date (using UTC time!!) with:
sudo date <MMDDhhmmYY>
To start the script manually to see the informational and error messages just issue:
samplerbox
On first invocation it can show GPIO errors you can ignore (the systemctl stop caused the GPIO to remain active).
You can stop again with <ctrl-c> and any subsequent starts won't have these GPIO errors anymore as <ctrl-c> is a controlled stop.
To check your topology you can use "sysinfo".
If you want to check what your midi device exactly sends, you can use "midimon" or "~/midimon.sh"
(for midimon.sh the running samplerbox should be stopped).
For more specific debugging, you can uncomment some of the print statements in the scripts (or add your own).
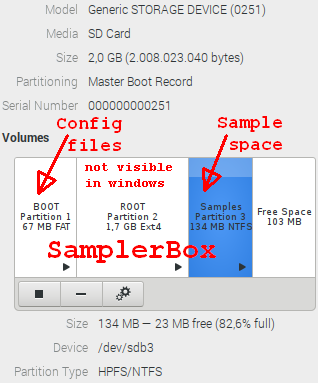
Enlarge the samples partition
Image on the right depicts the layout of the SD.
The exact size figures depend on both image version as well as how your OS/tool counts the bytes (1K can be 1000 or 1024).
The slack size can differ significantly as not all SDcards are equal (brand, disabled sectors etc), this is the reason for having this slack space: the image needs to fit on on any SD.
Your SD card is presumably larger than the image, but as the last used partition (samples folder)
is NTFS formatted from releases 2021 onwards, it can easily be enlarged without erasing any data.
- On windows PC you can use the included diskmanager.
- On linux the diskmanager varies per distribution.
- Many more free/commercial packages can be found on the internet.
Ofcourse it can be done from within samplerbox,
next instructions entered on the samplerbox commandline
will make the samples partition use the full SD capacity.
If you do this on your pc, adapt the statements to contain the correct device !!.
- Unmount the partition:
sudo umount /dev/mmcblk0p3
- Run fdisk:
sudo fdisk /dev/mmcblk0
- Check the SD's content:
Choose "p", you should see a screen like (sizes may vary):
Command (m for help): p
Disk /dev/mmcblk0: 1.9 GiB, 1977614336 bytes, 3862528 sectors
Units: sectors of 1 * 512 = 512 bytes
Sector size (logical/physical): 512 bytes / 512 bytes
I/O size (minimum/optimal): 512 bytes / 512 bytes
Disklabel type: dos
Disk identifier: 0x67e24ed1

Device         Boot   Start     End Sectors  Size Id Type
/dev/mmcblk0p1 *       2048  133119  131072   64M  c W95 FAT32 (LBA)
/dev/mmcblk0p2       133120 3459071 3325952  1.6G 83 Linux
/dev/mmcblk0p3      3459072 3721215  262144  128M  7 HPFS/NTFS/exFAT
- Choose "d" and choose "3" to delete the last partition
- Choose "n" to create a new partition and make next choices:
- "p" to create a primary partition
- enter the startsector you got with the "p" command (may be the default)
- enter required size (or accept the default to use the full disk size)
- Choose "t" to change partition type and make next choices:
- accept the default partition (should be 3)
- choose "7" (HPFS/NTFS/exFAT)
- Choose "p" again to check...
- Choose "w" to write the changes to disk
- Reboot
sudo reboot
- Unmount the partition:
sudo umount /dev/mmcblk0p3
- Expand the filesystem to the partition size
sudo ntfsresize /dev/mmcblk0p3
- Reboot again
Some goodies
-
- If the stick is formatted as exFAT instead of the required FAT32 it will not be found by RPi.
This is reported to be remedied by installing exFAT support driver (exfat-fuse).
However, this will also need:
- adapting /etc/usbmount/usbmount.conf
- changing the ro-rw switching in gp.py
Please contact me via the
if you think it's useful to include this possibility.
- Raspberry PI low level peripherals: GPIO
- Raspberry.GPIO.Python wiki: RPi.GPIO module basics.
- The 8-bit code for the LCD display is untested, so you may need How to use character LCD (especially the initialization scheme).
- Article on the WAVE file format.
- For connecting the samplerbox via cable without network I use a fixed IP address on the ethernet connection of my laptop in combination with a DHCP server. On Linux just setup the DHCP server for your distribution, for windows I found a free DHCP server.
- PI2 and lower: if your USB devices are not stable because of using much power, Boost USB Current in Raspberry Pi 2 and B+ shows ways to double the software limit on the USB ports power supply.
More Power For Raspberry Pi USB Ports is an in-depth article on the same subject and gives the hardware solution to get to 4 times more power.
- One cheap soundcard occasionally produced nasty noise, mostly when using the function buttons. I bypassed it by adding "dwc_otg.speed=1" to cmd-line.txt. This however made sample loading slooooow and disabled the usb-keyboard. Several discussions can be found, none giving me a full picture of the issues here. FYI: in depth, quick, available cmd parameters
Changing from pyaudio to sounddevice made the problem disappear.
|